CLICK HERE FOR FREE BLOG LAYOUTS, LINK BUTTONS AND MORE! »

Tuesday, October 11, 2011

Christmas Money Wallet

I wanted to create a gift wallet for Christmas. I often give my nephews money for their gift and I like to put it into something a bit more exciting than an envelope or bought card, so I came up with this idea.


I have made it fit the size of a $20 note and smaller and decorated it with our Christmas Designer Series Papers "Letters to Santa". I made a band to go around the wallet with old olive cardstock and decorated it with the decorative label punch and holly.


While I was making wallets, I made this one. I thought this would be nice for a birthday gift idea.
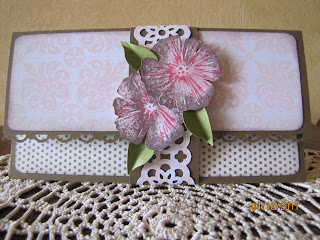


I had seen this card made earlier and just loved the style of card. I have used the DSP papers "Beau Chateau", white cardstock and the Scallop Trim Border punch. I have decorated it with flowers from my stash. I used cream flowers but sprayed the blue one with dye I made using Marina Mist ink refill and water.


This version on the card was also made using the DSP papers "Beau Chateau" and Very Vanilla cardstock.


I decorated the inside of card using the same paper set and the Scallop Trim Border punch.


Monday, October 3, 2011

SU Training Day

We had a few fellow demonstrators get together on Sunday for a training day. What a great day, it was so good to get together and meet other demonstrators and throw some of our knowledge around the table. We all came away from the day feeling a little tired but somewhat inspired.


We all provided a Christmas make'n take item.

Have a look below and get inspired for your Christmas card ideas.


Thanks to all you lovely ladies who came for the day, it was great to meet you all, and thanks Lisa for organising a wonderful afternoon. I am sure we will have plenty more like it.


Monday, September 26, 2011

Another bow fronted card

I am really enjoying making these cards.

I made this bow fronted card using papers from the Paisley Petals Designer Series paper set and co-ordinated it with Marina Mist card stock and Marina Mist ribbon. The photo is a little unclear as there is a reflection off the acetate sheet. I found a photo on the internet and printed it off and attached it to a piece of Marina Mist cardstock. I have used flowers from my supply cupboard and used the embosslits die Sweetest Stem for the leaves.


For this next cross over card I used the same Designer Series Papers, Paisley Petals.
I cut out the flowers from one of the papers and attached to the band. I also decorated the band using the Lace Ribbon Border punch.


Thursday, September 8, 2011

Awaiting order

I am patiently awaiting my order from the 2011/2012 Ideas Book and catalogue to arrive, so in the meantime I have been working on a couple of birthday card ideas for girls. I have used some supplies from my pre Stampin' Up days.


For this first card I used the Round Tab extra large punch to make a bodice shape for the dress. I used the large oval punch to punch out a neckline shape. Then using the scallop oval punch I punced out 6 shapes and arranged them to form a skirt. I have attached pearls around the neckline to become a pearl necklace and scattered a few pearls on the dress.

I made another card using this style, instead of punching out patterned paper for the skirt I used vallum that I had run through the big shot to emboss a pattern. I used pink paper for the bodice and it looked like a ballerina tutu.


For this next card I used multipurpose ashesive sheets and attached cut out paper shapes to form a mosiac pattern. Then I embossed the card so it looked like grout inbetween the tiles and attached a sentiment.

A really easy card to make but I love the effect.


Tuesday, August 30, 2011

Dunkleys Craft Show


August has been a very busy month for me.

I helped out a friend and fellow Stampin' up Demonstrator, Lisa Bullock, with the Dunkleys Craft Show. It was held on Christchurch on the 19th, 20th and 21st of August.


It was an extremely busy weekend and a great way to promote Stampin' up products.


We were really pleased with our display and got some really good feedback on the items we were showing. It was a great way to provide inspiration to others.


We held a door entry gift basket promotion . We managed to get a wonderful man to draw a name out. The prize went to a lovely lady from Nelson. I am sure she will great enjoyment using the product.


Wednesday, August 10, 2011

Bow Fronted Card


Today I have been working on Bow Fronted Cards. I attended a card class this morning and this was the style of card we made.

I came home from the class and while I was still motivated I made another card. I used the
Designer Series Paper, Sweet Soiree.

I used the Top Note die to cut out a window in the front of the card, and another Top Note die to be on the inside of the card. I have decorated it with handmade flowers using the
5 Petal flower and Boho Blossom punches. I added a few little butterfies on the front of the card.

To make the bow shape in the front of the card I attached acetate to each side of the front of card.

I am really inspired to make more cards in this style as they are so elegant.


My next project was to make a name tag. I have put a challange out to all the ladies who attend my craft days to make their own name tag, so this my effort.


Again I have used the Designer Series papers, Sweet Soiree and the Top Note die.


Can't wait to see what all the ladies come up with.


Thursday, August 4, 2011

Retiring List


It's now time to say goodbye! Hundreds of products from the 2010-2011 Idea book and Catalogue are retiring, and now is the time for you to get them before they are gone.


Click on the picture to view all the retiring products.


If you are interesting in ordering any of the products let me know by emailing me on


I am now taking orders for the new 2011-2012 catalogue, get in early to view the wonderful new colours and products.


Thursday, June 23, 2011

Embossed cards

I have been having fun making these cards using the textured embossing folder. This is such an easy card to do, but very effective.

The left card I placed all different shape circles onto the very vanilla card stock then ran it through the embossing folder.

With the right hand card I stamped the Happy Birthday sentiment onto Very Vanilla card stock then placed different sized circle and then ran it through the embossing folder.

The texture may not show up too clearly but it gives the card a great affect.


My two daughters were a bit bored the other day so they sat down and had a go at making a card also. They both decided to use the owl punch, looks great.


The ladies at my craft day wanted to have a go at making a triple easle card.


We used the Designer Series papers Elegant Soiree and Very Vanilla and Soft Suede card stock.

The card on the left we used the Beautiful Wings Embosslits dies and the Elegant Bouquet embossing folder.


I really love the Beautiful wings butterflies. They cut and emboss all in one go. So versatile.


With the right hand side of the card I used the bracket from the Hearts & Bracket Originals Dies and once again place some butterflies.


Wednesday, May 4, 2011

Easel cards

I have been having fun experimenting with easel cards.

This one is a tripple easel card. I have let the centre easel come out a little bit further just to give it a different look.


I have used the Designer Series Papers Love letter. I wasn't too sure how cream and black would go. I was a bit worried it would look a book boring, but the contrast of Cherry Cobbler went well.


I have used flowers from my craft stash and little pearls to support the easel.


I tried a different approach to the easel card and tried a circle card. I used the same layout as above but used the Bigz Dies Scallop Circle and the bracket from the Hearts & Brackets Original Dies.


I enjoy making these cards and can't wait to try some other shapes and designs.


Sunday, May 1, 2011

Greenhouse Garden stamp

The Greenhouse Garden stamp set would have to be one of my favourite stamp sets. I just love the versatility of these stamps. I have used the pansy style stamp on this Birthday card.

I have used the Elegent Soiree designer series papers and inked the flower with Baja Breeze. I punched the leaves using the Two Step Bird punch. I used the Scallop Trim Border punch to frame the sentiment and decorated using pearls and ribbon.

This next card I made for me friends daughter, for her birthday. I haven't done alot of punch art but this was quite fun to make.

I made the girls dresses using the XL Scallop Circle punch and cut it down to get the desired shape. The other punches that I used were the XL Oval, XL Oval Scallop, Boho Blossoms,
and the 1 & 1.25" circle punches. I have decorated their dresses with small basic pearls.


Saturday, April 23, 2011

Easter gift and matching card

I hope you are all having a Happy Easter. The weather has been exceptional so far. I have my cousin and her husband down from Auckland and I advised them to bring down some warm clothing. I was expecting the weather to be terrible, as the weather at Easter usually is. Fortunately it has been great so far and we have been walking around in short sleeve tops.

I am a member of the Crafters Anonymous website and we had to exchange a handmade Easter basket and matching card.

This is the one I made for Colleen. I made a small gift box using the Top Note die and decorated the bunny using the Extra Large Oval punch, Large Oval punch, Extra Large Scallop Circle punch and the Small Circle Punch. I have added highlights to the eyes using the white gell pen and the wiskers using the Basic Black Stampin' Write Marker.


The card was made to match the gift box. On the back on the box and card I added a circle scallop punch as the bunnies tail.


Tuesday, April 19, 2011

Easter cupcakes

I have so much enjoyed not working many hours this school holidays. I have realised just how much I have missed with the girls when I was working so many hours in my old job.

Today we decided to make cupcakes and ice them with an Easter theme. We have two international students living with us full time and another one staying with us over the holidays.
They don't celebrate Easter, so this is a real experience for them.


The girls had a great time decorating the cakes. I thought my wee girl would have found it a bit more difficult, but I think she did the best job of them all.


I just had to take a photo of their efforts. Well done guys.


They look wonderful and they sure taste good too.


Wednesday, April 13, 2011

Botanical Gaxette Papers

I have been trying to catch up on some scrapbooking lately. My dad recently celebrated his 70th birthday and we got some really good photos of him. He is a little bit camera shy so it was really good to get some good shots of him. I used the new Botanical Gazette papers from the new Autumn/winter mini catalogue. This paper set uses the colours Early Espresso, So saffron, Very Vanilla, Cherry Cobbler, Not Quite Navy, Marina Mist and Old Olive. Such beautiful colours together. I have used embellishments and flowers from my supplies. I still have to add a bit of journalling to the second page, but I have run out of ink in my printer. I wanted to blog this to show off the lovely paper set and will complete the page asap. I changed to a new job this week and only work 2 mornings a week now, so it is my chance to catch up on unfinished projects and catch up on me time. Yesterday I attended a card class and we made this wonderful folded card. I am unsure of the name of the card, but it is just lovely.
I made the card on the right at the class and came home later and completed another one.


The card folds in flat for postage and sort of concertinas out to open.


This was a fun class to do and I am sure I will make more of this style. Something a little different.

Monday, April 4, 2011

Mothers Day Card

I am getting in early and have made a Mothers Day card for my mum. I have used the Textured Impressions Embossing Folder - Framed Tulips to form a boarder of tulips around the outline of the card and the stamps are from the Blessed Mother stamp set. The Framed Tulips embossing folder is from our recently released Autumn-Winter Mini Catalogue.

Monday, February 7, 2011

January Scrapbook Page

I am a member of the Crafters Anonymous website and I joined the group called "12 months of the year".. Each month on 2011 we scrapbook a page of something that has happened that month.

January was a very quite and uneventful month for us as both Bruce and I were not able to get much time off to spend with the girls over the Christmas holidays. It was rather hard to find something exciting to scrap a page on, but my 2 girls have 2 very special friends that are more like sisters to them so I took a photo shoot of them and decided this would be the theme for January.


We were given an optional layout sketch to follow and I decided to give it a go. I was really pleased with the photo and the way the final product turned out.